
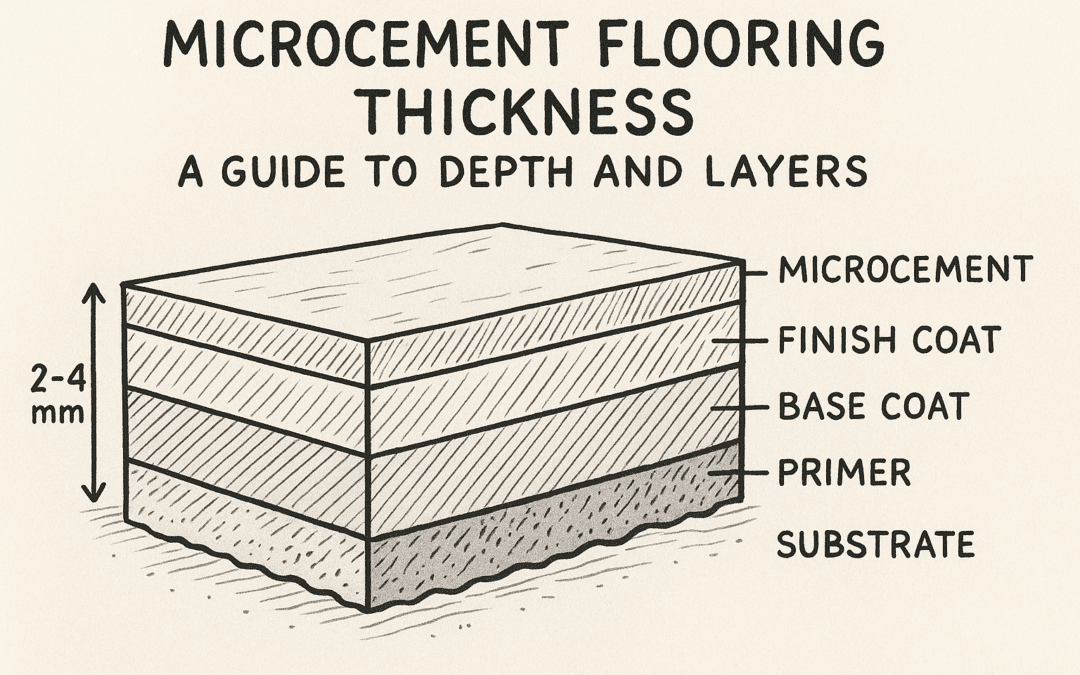
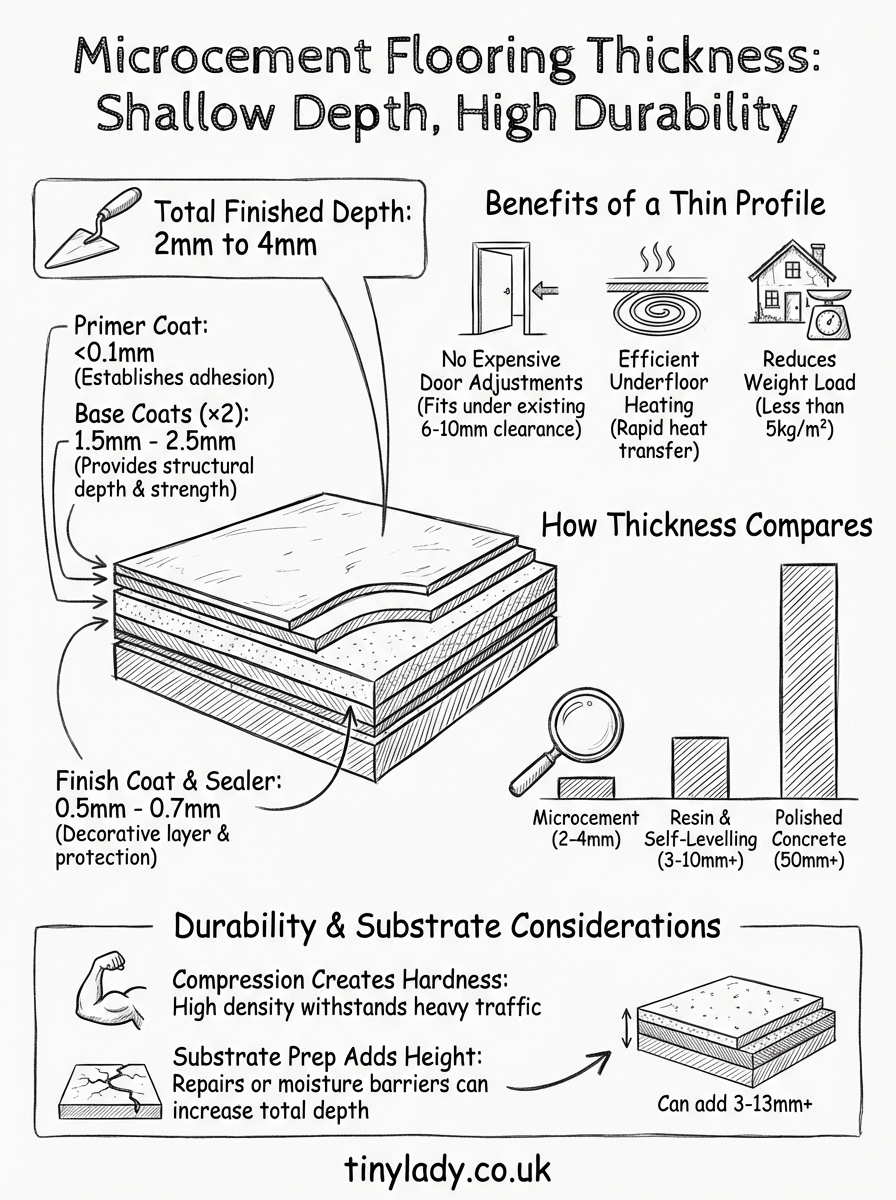
Microcement flooring thickness refers to the actual depth of the finished surface once all layers have been applied and sealed. Most professional installations measure between 2mm and 4mm total, making this one of the thinnest continuous flooring systems you can specify for renovation work. That shallow profile comes from building up multiple thin coats rather than pouring a single thick layer like you would with traditional screeds or polished concrete. The minimal height makes it practical for spaces where door clearances matter or where you need to match existing floor levels without ripping out substrate or making extensive structural changes.
This guide explains how each coat contributes to the final depth, why substrate preparation can add millimetres to your total build height, and how microcement compares to alternatives like resin or self-levelling compounds. You’ll see exactly what thickness to expect for your specific project, whether those few millimetres genuinely affect long term durability in high traffic areas, and when you might need to account for additional depth from primers or repair layers beneath the finished surface.
Why a thin floor profile benefits your renovation
You save considerable time and budget when your new flooring adds only 2mm to 4mm to your existing floor height instead of the 30mm or more required for traditional screeds. That shallow build means you rarely need to adjust skirting boards, door frames, or thresholds, which would otherwise require a joiner’s involvement and several additional days on site. The thin profile also simplifies transitions between rooms when you’re only resurfacing one area rather than the entire property, because you can feather the edge or create a barely noticeable step instead of installing bulky reducer strips that interrupt the visual flow.
Avoids expensive door adjustments and trim work
Your internal doors typically have 6mm to 10mm clearance above the finished floor level, which means adding anything beyond a few millimetres forces you to plane or replace every door in the affected zone. Microcement flooring thickness stays within that tolerance in most cases, so you preserve the existing ironmongery and avoid the cost of re-hanging or cutting down solid timber doors. External doors present an even tighter constraint because building regulations specify maximum 15mm threshold heights for accessibility, and microcement lets you comply without installing ramps or step-free access solutions that compromise your building line.
Skirting boards sit flush to the original floor surface, so any material thicker than 5mm creates a visible gap that requires either new taller skirting or additional trim pieces to bridge the difference. You skip both expenses when your new surface adds minimal height, which also means you can match the existing reveal depths around doorways and maintain consistent visual proportions throughout the space.
"The shallow depth saves you from the cascading costs that thicker systems create across joinery, accessibility compliance, and decorative trim."
Preserves underfloor heating and existing insulation
Underfloor heating pipes or electric mats typically sit just beneath the surface layer, and adding excessive depth above them reduces thermal efficiency because heat takes longer to reach the room. Microcement’s minimal thickness maintains efficient heat transfer without requiring you to recalibrate the system or increase running temperatures to compensate for additional thermal mass. That efficiency matters most in retrofit projects where you’ve already installed heating beneath an existing screed and can’t easily adjust the depth or reposition the pipes.
Insulation boards beneath the screed also perform best when you don’t add unnecessary weight or compression forces that reduce their effectiveness. A lightweight surface finish like microcement avoids crushing softer insulation materials and maintains the thermal performance you originally specified, which becomes particularly relevant in listed buildings or conservation areas where you need to improve energy efficiency without removing original floors.
Reduces weight load on older structures
Period properties with timber joists or suspended floors have limited load-bearing capacity, and every additional kilogramme per square metre increases the risk of deflection or long-term structural movement. Traditional screeds at 30mm depth add approximately 60kg per square metre when you include the screed itself plus adhesive layers, whereas microcement at 3mm contributes less than 5kg per square metre because you apply it directly over the existing substrate. You protect historic joists from unnecessary stress and avoid the expense of structural surveys or reinforcement work that thicker systems would trigger.
Ground floor slabs in Victorian or Edwardian homes often lack proper damp-proof membranes, which means you need to keep additional floor height to a minimum when installing modern finishes. The shallow profile lets you incorporate thin membrane systems without raising the floor so much that you create drainage issues or increase flood risk in areas with high water tables.
How we build the system layer by layer
Microcement flooring thickness builds up through distinct application stages rather than arriving as a single product you pour and level. Each coat serves a specific technical purpose, from creating mechanical bond with your substrate through to protecting the surface from moisture and wear. Understanding this layer sequence helps you see why the final depth stays minimal even though we apply multiple passes, and why attempting to speed up the process by reducing coats compromises both appearance and longevity.
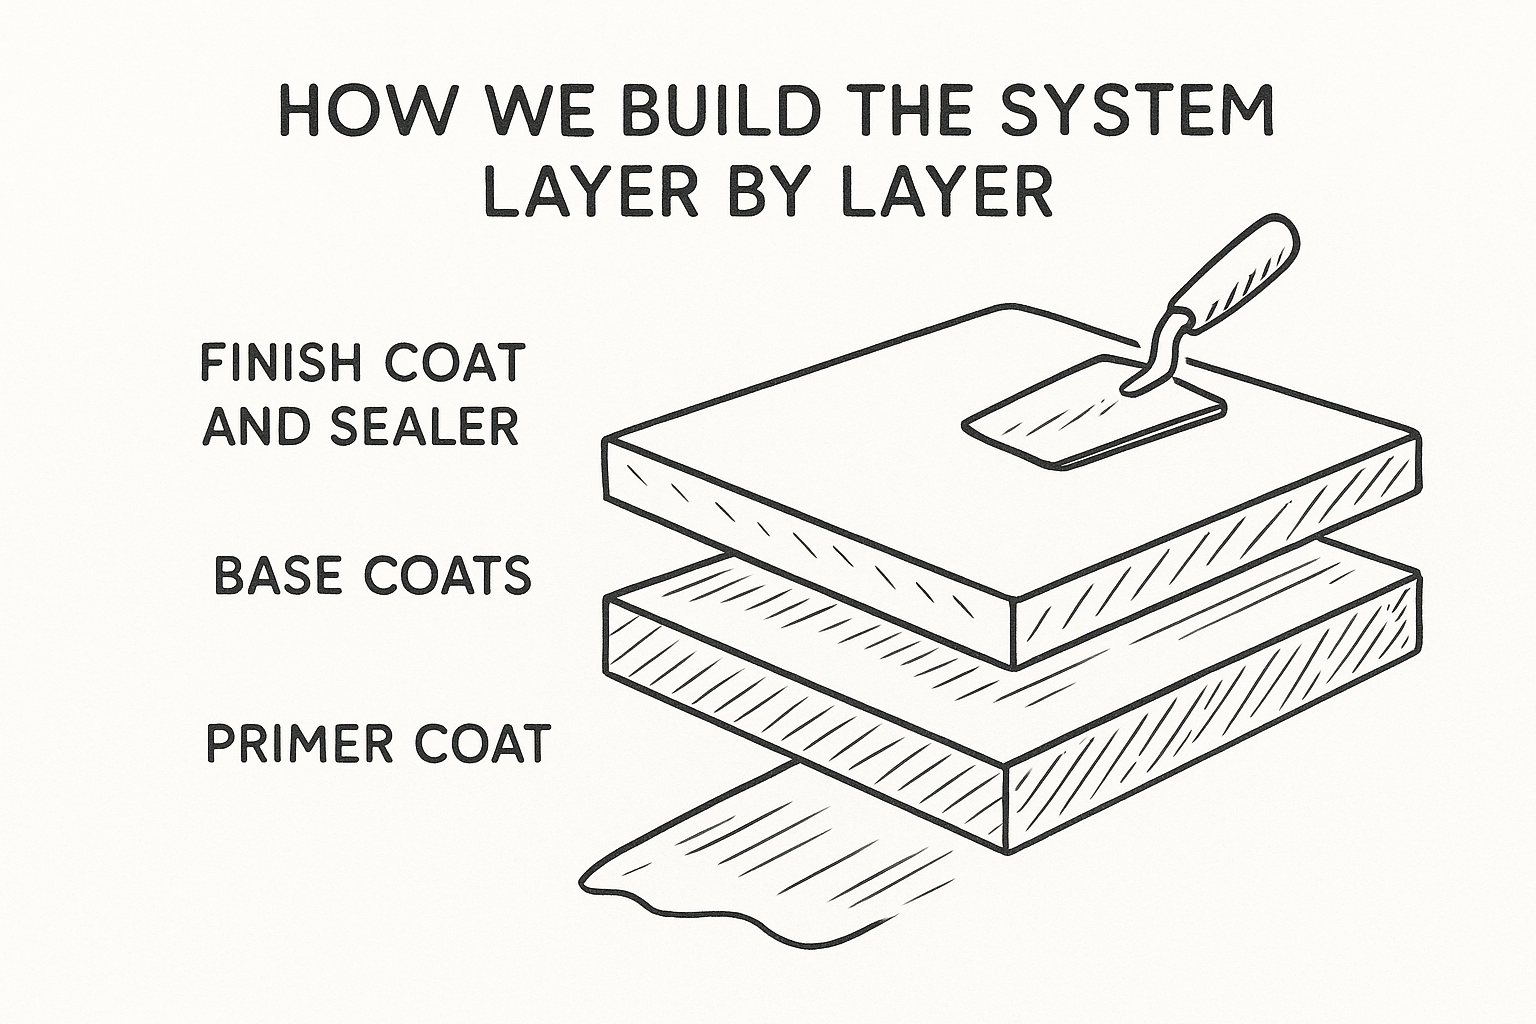
Primer coat establishes adhesion
You start with a primer layer that penetrates the substrate rather than sitting on top of it, so this coat adds virtually no measurable thickness to your overall build. The primer soaks into concrete, screed, or tile surfaces and creates a mechanical key that stops subsequent layers from delaminating under thermal movement or impact. We apply this coat at approximately 100 to 150 grams per square metre, which translates to a film thickness of less than 0.1mm once the carrier solvents evaporate and only the bonding resins remain.
Different substrates need specific primer formulations because porous concrete absorbs more liquid than dense porcelain tiles, but none of these variants contribute noticeably to your final microcement flooring thickness measurement.
Base coats create the structural depth
Base layers account for roughly 80% of your total thickness, typically applied in two separate coats of 1mm to 1.5mm each with drying time between passes. You build these coats using a steel trowel that compresses the microcement paste and removes excess material, which means the wet application thickness reduces by approximately 30% as water evaporates and the cement particles consolidate. First base coat goes down to fill any minor substrate irregularities and establish a consistent working surface, then the second coat adds strength and prepares the profile for finishing work.
"Each base coat needs 4 to 6 hours to cure before you can apply the next layer without disturbing the surface."
Finish coat and sealer complete the system
Your top decorative layer adds 0.3mm to 0.5mm and receives the final trowel polish that creates microcement’s characteristic smooth texture. This coat uses finer aggregates than the base layers, which allows us to achieve tighter compression and a denser surface that resists water penetration. Sealer coats then protect this finish with two applications of polyurethane or epoxy resin at approximately 100 grams per square metre each, adding less than 0.2mm combined because these products cure to very thin films that fill microscopic pores rather than building visible depth.
How microcement thickness compares to other materials
You gain significant advantages in retrofit work when you understand exactly how microcement flooring thickness measures against alternatives that might achieve similar aesthetic results. Traditional polished concrete needs far more depth to reach a usable surface, while resin and self-levelling systems sit somewhere in the middle depending on their specific formulation and intended purpose. These thickness differences directly affect your budget because deeper systems require more material, longer installation times, and potentially structural modifications that add weeks to your programme.
Polished concrete requires much greater depth
Polished concrete demands a minimum 50mm screed depth before you can begin the grinding and polishing process that reveals the aggregate finish. You need this substantial thickness because the mechanical grinders remove approximately 3mm to 5mm of surface material to expose the decorative stone, which means anything thinner risks grinding through to the substrate underneath. The installation also adds considerable weight at roughly 120kg per square metre, compared to microcement’s negligible mass, making polished concrete impractical for timber floors or upper storeys in period buildings where joist capacity becomes a limiting factor.

Resin flooring sits in similar territory
Epoxy and polyurethane resin floors typically apply at 1.5mm to 3mm total thickness, which puts them in comparable territory to microcement for renovation projects where you need to preserve existing floor levels. These systems cure to a completely waterproof membrane that works well in commercial kitchens or industrial spaces, though you sacrifice the natural texture and warmth that cement-based finishes provide in residential settings. Installation costs often run higher because resin products require precise mixing ratios and controlled temperature conditions that extend the working window beyond what microcement demands.
"Resin matches microcement on thickness but brings different performance characteristics that suit specific commercial rather than domestic environments."
Self-levelling compounds vary by purpose
Basic self-levelling screeds go down at 10mm to 15mm depth when you use them to correct uneven substrates before installing another flooring type, but you can reduce this to 3mm with specialist fast-track formulations designed as final wearing surfaces. These thinner variants cost significantly more per square metre than standard compounds and still require a separate sealer system to achieve the durability that microcement delivers as an integrated finish, which erodes the apparent cost advantage of choosing a cement-based alternative over the complete microcement system.
Does minimal thickness mean reduced durability?
Your concerns about whether microcement flooring thickness compromises longevity are understandable when you compare 3mm against the 50mm depth of polished concrete or traditional screeds. The reality is that material density and application technique determine durability far more than raw depth, because microcement achieves hardness through extreme compression during troweling rather than relying on mass to resist wear. Properly installed systems in commercial environments regularly outlast thicker alternatives because the cured surface reaches compressive strengths exceeding 40 MPa, which matches or surpasses many conventional floor finishes that occupy ten times the vertical space.
Compression creates exceptional surface hardness
You achieve durability through compacting the microcement paste during each trowel pass, which forces out air pockets and excess water to create a dense crystalline structure at the surface. This mechanical compression continues across all layers, with each coat adding to the overall density rather than simply stacking loose material on top of the previous application. The final polyurethane sealer then penetrates microscopic pores and cures to form a chemical bond with the cement matrix, creating a hybrid surface that combines cement’s abrasion resistance with resin’s waterproof properties.
"Surface density from proper troweling delivers strength that thickness alone cannot provide."
High traffic installations demonstrate proven performance
Retail spaces and restaurant kitchens regularly specify microcement at standard 3mm to 4mm thickness because these environments need flooring that withstands constant foot traffic, trolley wheels, and regular wet cleaning without degrading. Your residential floors experience far less stress than a busy café that serves 200 customers daily, so the same system easily handles domestic use for decades when you maintain the sealer coats according to the manufacturer’s schedule. Airport terminals and hotel lobbies also install microcement in specific zones, which proves the material’s capability to survive genuine commercial abuse rather than just light residential wear.
Installation quality determines long term results
Poor technique undermines durability regardless of how much microcement flooring thickness you specify, because rushing the application or skipping proper curing time between coats creates weak spots that fail under normal use. You need experienced installers who understand trowel pressure and timing to achieve the compression that makes thin installations durable, which is why we emphasize contractor selection as heavily as material specification when you plan your project.
When substrate preparation increases total depth
Your quoted microcement flooring thickness of 3mm only tells part of the story when your existing substrate needs repair work or protective layers before you can apply the finish coats. Damaged concrete, uneven screeds, or floors with moisture issues require additional preparatory products that add measurable height to your total floor build, sometimes doubling or tripling the final depth beyond what the microcement system alone would contribute. Understanding these potential additions helps you plan accurate floor levels and avoid discovering mid-project that your doors no longer clear the new surface.
Repairing damaged or uneven substrates
Cracked or spalled concrete needs filling with repair mortars that cure to 5mm or more in deeper voids, particularly around expansion joints or where previous flooring adhesives have pulled chunks from the surface. You build these areas up flush with the surrounding substrate before applying primer, which means your total floor depth in repaired zones exceeds the standard microcement thickness by whatever height the repair material occupies. Uneven screeds with dips or humps beyond 3mm variation across a 2-metre span also require grinding down high spots or building up low areas, and that remedial work contributes to your overall build height even though it happens beneath the visible finish.
"Substrate repairs can add 3mm to 8mm in affected areas, turning a 3mm microcement installation into an 11mm total build."
Installing moisture barriers on problem floors
Ground floor slabs without proper damp-proof membranes need a liquid membrane system applied at 0.5mm to 1mm before you can safely install microcement over them. These barriers cure to waterproof films that stop rising damp from attacking the cement matrix, but they occupy vertical space that adds to your final floor height and requires accounting for when you measure door clearances. Some properties need two-part epoxy barriers at 2mm thickness when damp readings exceed moderate levels, which further increases your total build beyond the microcement flooring thickness specification.
Levelling compounds bridge height differences
Transitioning between rooms with different existing floor levels often requires a tapered self-levelling screed at 3mm to 10mm to create a gradual slope rather than an abrupt step. You apply this compound across the threshold zone before installing microcement over the entire area, which means your build height in that transition space reaches 13mm or more when you combine both layers. Budget for these additions during your initial survey so you can adjust door heights or specify threshold strips before installation begins.
Final thoughts on flooring thickness
Understanding microcement flooring thickness helps you plan renovation projects with confidence, knowing that the 2mm to 4mm finished depth preserves your existing floor levels while delivering a durable surface that matches or exceeds thicker alternatives. You avoid the cascading costs of adjusting doors, skirting, and thresholds that traditional screeds create, and you protect older structures from unnecessary weight loads that compromise joists or suspended floors. The shallow profile also maintains thermal efficiency when you have underfloor heating, because minimal material depth allows heat to transfer quickly without requiring higher running temperatures.
Your substrate condition ultimately determines total build height more than the microcement system itself, so factor in repairs, moisture barriers, or levelling compounds during your initial survey. Professional installation makes the difference between a finish that lasts decades and one that fails prematurely, regardless of how carefully you specify the thickness. Contact our specialist team to discuss your project requirements and receive accurate depth calculations that account for your specific substrate conditions.